
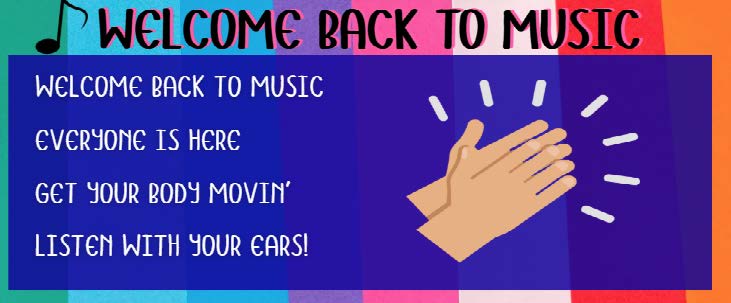

I made this lesson for my students as a review. This lesson can be used for:
- Reinforcing steady beat
- Practicing Body Percussion
- Adding increasing levels of difficulty of body percussion patterns
- The use of ostinatos through body percussion
- Adding un-pitched percussion instruments
- Students can create their own body percussion solo, with a partner, or in a small group
- Students can add their own movement to the song solo, with a partner, or in a small group
Click here for Canva slides / Click here for Canva with audio / Click here for song
Watch a short video example:
Introduction
I begin by teaching the song by rote. Once able, add movements( moving your body in different ways to each line of the song). When we sing the song again, I change my movements. Then incorporate body percussion without any visuals.. I start the body percussion and students join in when able. . See the link for the video, above for an example! To view a more in depth look on this lesson, see section A at the bottom of this lesson.
2nd step
Students create their movement for “ get your body movin’”. When comfortable, students partner up and create that movement together. Will you connect in some way with your partner in the movement? Will one student be the leader in the movement? Explore Options.
3rd Step
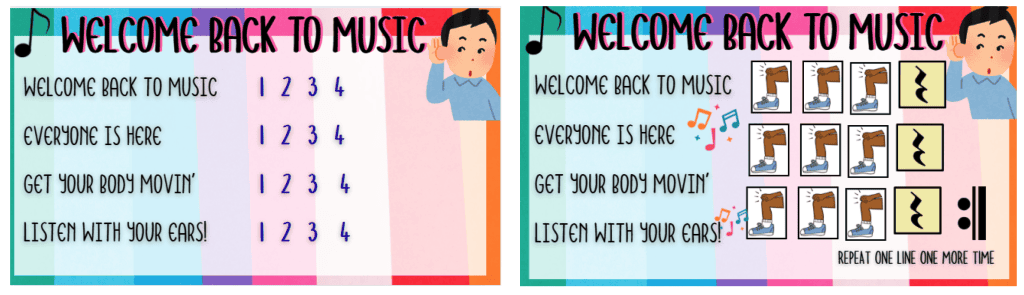
Add the recording of Welcome Back To Music. Begin showing the visuals for the Body Percussion on each B Section, and have students practice the body percussion. Each body percussion section is 16 OR 14 measures long. It might be good to have students rest for the first measure to see the body percussion and then practice. After some review, have students partner up. While singing the song, students create movement, on the b section they practice the body percussion.
Extensions
Have students switch partners on every other B Section. For example:

More Extensions
Begin practicing the song where it isn’t a call and response. Sing the song together with 1 measure of rest after each melody line. Then add body percussion on the rests. Later on, add unpitched percussion on those measures. Your form could be set up as: hand drums perform on their own in a b section, then rhythm sticks perform on their own in another b section. Then combine instruments in a b section. Building Blocks would be a wonderful addition after this, and then students can create their own rhythm.


SECTION A: Let’s do a deep dive into steps for the lesson!
To Begin
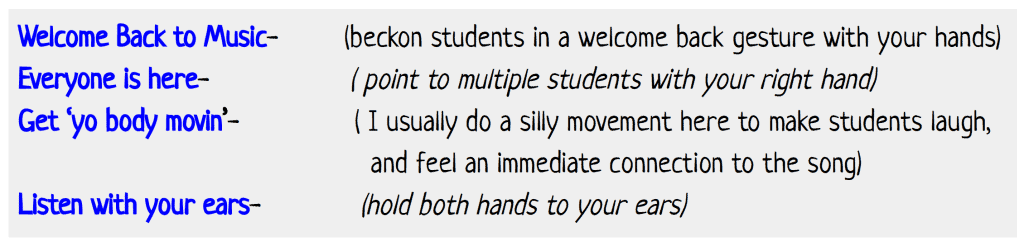
Teach the song by rote. I incorporate some kind of movement for each line of the song. For example:
Here’s a tip!
The more you have fun singing the song and enjoying it yourself, the more students will get involved and immediately start singing, and if you get silly, that gives them permission to try new things, and feel more comfortable doing it.
2nd step
After students are singing comfortably, then I begin to change the moves for each line of the song. This makes it more interesting, and keeps their focus on you. “What is Ms. Johnson going to do next?” This part is the A Section.
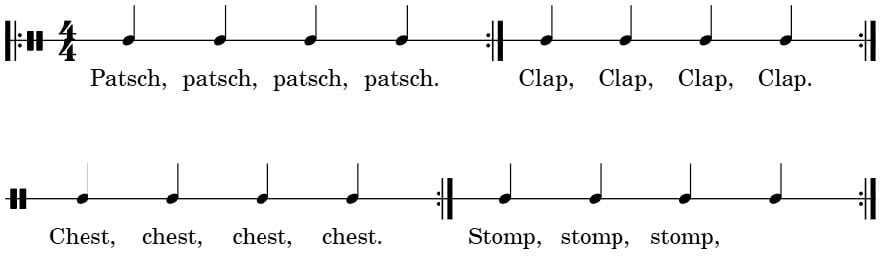
I begin adding the B Section right away. After singing the song, I begin patsching the steady beat, when everyone has joined in and I have done a quick assessment, I switch to another BP to the steady beat. I go through: Patsching, clapping, tapping chest, stomping (snapping I save for another day), and clucking (A). These are all to the steady beat.
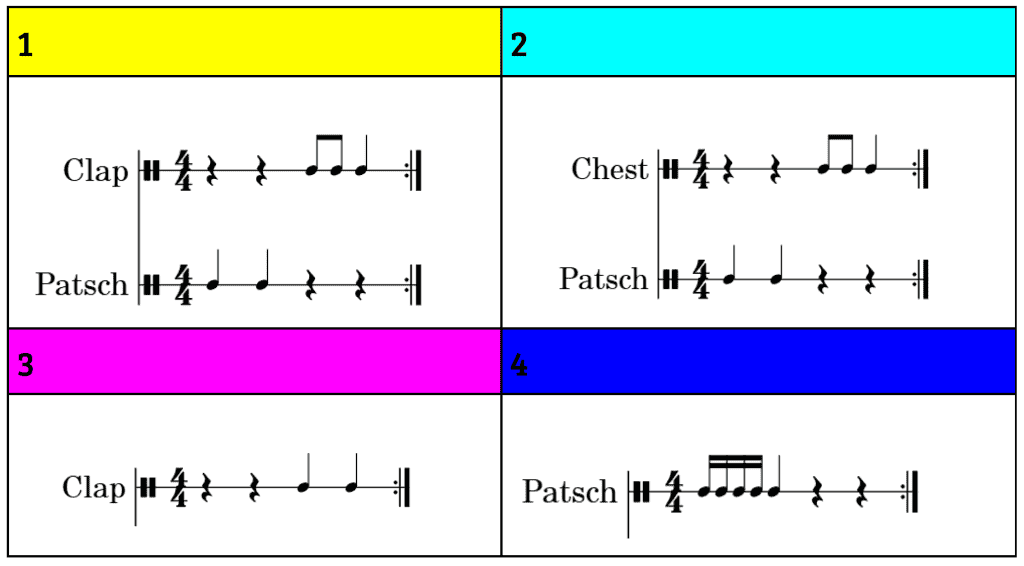
From there I begin to add some rhythms using two types of body percussion (B) I use the quarter note, and pair of eighth notes to start. Then I add rests. The arrangement works really well to have Beat 1 and Beat 2 use the same body percussion, and then beat 3 and beat 4 use a different body percussion. Then from there, add sixteenth notes, and then syncopated rhythms.
(A) Example:
*Explore other body percussion
(B) Example:
3rd Step
After a few music lessons practicing imitating my body percussion, I ask students to show me their favorite body percussion. Then we switch their singing part. Instead of you echoing after me, now you sing with me, we are going to sing with Ms. Johnson this time. I add a measure of rest after each line of music.

In my Canva slides, after this page, I move to having students count and clap to 4, and then those measures are replaced with body percussion.
*An extension would be to use music notation with the body percussion.
Time for Composition
Now that the students are comfortable with the song, keeping the beat, and performing body percussion, can they work with a partner, and create their own movements for each line of the song? When comfortable, students do their movements and perform body percussion after each measure. Depending on grade level, maybe you just have Kindergarten do the movements, 1st Grade creates movements and claps on 1, 2, 3, 4, and 2nd Grade creates movement, and reads and performs the body percussion after each line. From movement composition, you can give students the opportunity to create their own body percussion for the B section. You could print out visuals of body percussion and have them work in small groups creating an ostinato that is one measure long during the b section. For upper elementary students, they could create 2 measures, or 4 measures of body percussion that repeats.
A SECTION: students only create movement, their body percussion is already chosen by you.

B SECTION: younger grade levels perform the ostinato, and older grade levels can create their own here. I did not add a slide for that, however, if you scroll to the end of the canva slides I made some templates for you to use with this.

A Note About Working With Partners
This is something I start in kindergarten. The expectations are:
1. Stand up
2. Raise your hand
3. Look for a partner safely- (connect, which means high five)
4. Then find a spot and sit down.
We thoroughly discuss each step and possible actions. I always give one step at a time. For example, I would say to my kindergartners, “Stand up and stay right on your spot!” When everyone is standing I say, ” Raise your hand and look around but do not leave your spot”, and then I have them try to find a partner. At anytime during each step, if there are some friends who aren’t doing the expectation, I discuss this and wait ’till everyone is doing it before I move on to the next step. *It’s always ok to have them stop and come back to their spot if you see something that you need to discuss further and then let everyone try finding a partner again.
I use this with scattered formations for partners. We have a lot of discussion on what this looks like, I do a lot of modeling. We talk a lot about how it is ok if you do not get the partner you want but everyone is pretty amazing, and we are so lucky to work with them! I also tell them that we have multiple partners, so you will get a chance to work with multiple people. My goal when first introducing this (and also in 1st, and 2nd at the beginning of the year) is can we find a partner, safely, team work, and solve issues on our own. I use an echo speech piece that i wrote that cues students when to find a partner:
Can you find a partner? (Can you find a partner?)
Raise your hand (raise your hand)
Look around (look around)
Co-nnect! (Co-nnect!)
Then sit down (then sit down)
We learn the speech, previously in earlier classes. 1st time trying partners, I say, “The minute you sit down, your voice goes…..” and students say “off!” Then I ask students to tell their partner their favorite ice cream, then we find another partner. I have them repeat this multiple times so they see what the expectation is. We also talk about ignoring people and how that is not nice, and also to pick people that are closer to you. If you try to go to someone farther away, they might have a partner by the time you get there. I use each disagreement as a teachable moment, and I discuss this with the whole class if we need to address something. With a lot of opportunities to practice this, finding partners goes a lot smoother! When they can find partners with no issues, then I incorporate dances, songs, etc.
I hope this lessons brings you as much joy as it did for me creating it for my students!
If you have any questions, please don’t hesitate to reach out!
Click here to download a pdf of Meredith’s lesson
Click here to find your local AOSA Chapter


